Showing posts with label tutorial. Show all posts

Saturday, March 28, 2015

sweet baby hatching chics!


These baby chicks make my heart melt. Seriously. They're so fuzzy and cute. I can just leave them on my shelf and (probably) not eat them. They look even cuter sitting in their lil welcome to the world nest. Wanna see?! Well get your stuff ready because you're about to see them live, you're makin em!

  You had to know. YES I am using My Little Cakepop's snowman mold for these cuties! As seen in my previous posts, just squish your already made cake pop dough into the mold and close. Voila! Baby chick body ready to go!


To make some wings just take a candy wafer and cut in half. Have your melted yellow candy melts ready, toothpicks, cake pop stand, and yellow sanding sugar to give him a nice fuzzy coat.


 Next dip your stick in the candy melts and insert in the bottom of the chick. Once secure, use a toothpick to put some melted candy on the sides of him and stick on the wings like the picture. Let them dry in the stand before dipping.


Once the wings are dry, fully submerge your baby chick in yummmmmy yellow melted candy. Pull him out quickly and tap off the excess candy.


Once all the excess has run off, coat him in the sanding sugar before the candy melts set. Using a spoon sprinkle on over the bowl to catch all the extra sugar. Good job! How does yours look? I know he looks as cute as this little baby :) Set him in the stand to watch you make the cracked shell.


Roll out some white fondant not too thick and don't ask how thin because I eyeball it. Just like they do with your cheese at the deli. BAHAA. If you have these cool cutters, GREAT! If you only have the star, use it! Use whatever you have to make a cracked shell shape. Doesn't need to be perfect. It's a cracked shell. K.


Next you want to use something to make a small hole in the larger (star) shell. This is for if you would like to keep your chick on the cake pop stick like the very first picture. I just used a piping tip. Anything the size of a cake pop stick will be a-ok.


He's ready to speak so he needs a beak! Grab that container of pretty mixed hearts that you use for stuff like this! Pick out two orange hearts for the beak. Using a toothpick dab a little yellow candy on his face. Pointed side out, press on and hold a few seconds to secure each heart in the open beak look. LOL. He is so funny!


To finish his face using a toothpick dab on two little black eyeballs with your melted black chocolate. He's alive!


Slide the larger star up and using a toothpick dab some melted yellow candy on the shell. Quick before it dries, fold up and secure on the chicks body.


For the top, dab some more melted candy on and set on his head, securing all the points down and over his head.


Just like this! So cute the way they are! But I wanna put them in a little nest to fit in my BRP box shop boxes so people can give for Easter. So let's get to oreos!


Here's your set up. Hopefully you have an oreo mold to make your life easier. So many places online carry them so just google. But if you don't just throw them in your bowl of milk chocolate and fish them out with a fork setting on wax paper to dry, like the old days. HA! But as far as the oreo mold, fill each one with 2 tsp of melted milk chocolate. It's messy, so yea.


Once filled pick up your mold and drop a couple times to smooth out, see.


Drop your oreos on top of the flattened out chocolate...


Then press into the mold so that the chocolate comes up the sides and starts to cover the Oreos. Great job! So great.


If the press down didn't cover them completely just dab a little more and spread over to cover the cookies. Just like this.


And should look like this after you do that, but don't worry because we are about to do this ...


and smooth it out! Pick it up and slap it a few more times on your table to smooth and even out and get all those rising bubbles to pop. PS notice I wiped the splatter off with a clean paper towel. Do this so you don't have any freaky sticky pokies on your Oreos when they set. Ok, to set you then put in the freezer about 7 minutes. Yea I like the number 7. You  don't want to take out too early because they be ugly if you do.


See nice and smooth except that one, because it didn't like the cold but its alrighty because it will be covered. Yay.


But first we need to remove the sticks. So, as before in my other posts, firm and gentle grasp on the cake pop and the stick and slowly spin the stick several times before starting to pull it out, spinning the stick as you pull it out. There. They are free!


Get your Bakerella edible grass ready and drop a blog of chocolate on top of the Oreos.


Because the Oreos are still very cold, quick get your chic and the grass on the warm chocolate before it dries. Do this for all three and....

Tada! Cute as can be! Now box them up and give them away for a Happy Easter Sunday!


Tuesday, February 24, 2015

sequins and bling!


Soooo, I wanted to try something! And not just creating these cake pops, but actually finally creating a "blog."  I would really rather SHOW people how to make things. What I mean is, it seems easier for me to jump in front of the camera and just create something "live" rather than snap 87,000 pictures and type it out, yadayadayada...

But then what about times like this? I have this fun cake pop I want to try and I want to share it, but there's no way I can make a video. Big Dan ( my husband ) works from home but when he goes into the office, I can try to squeeze in a video in the small amount of time I have between my shifts. But it doesn't always play out that way.  So, I can't disturb him and his calls and well you don't want to hear his conversations in the back ground of my videos anyway. And forget when the boys get home. Unless you want to hear fart sounds and shut up / I hate you repeatedly. LOL, jk, but really. So videos aren't always possible. Sad face.

So, I said to myself, sit your butt on the couch later tonight and type it all out. Yea, like a research paper, like a scientist who collected data, and is ready to share it with the world! I said self, you can do this! I am doing it.

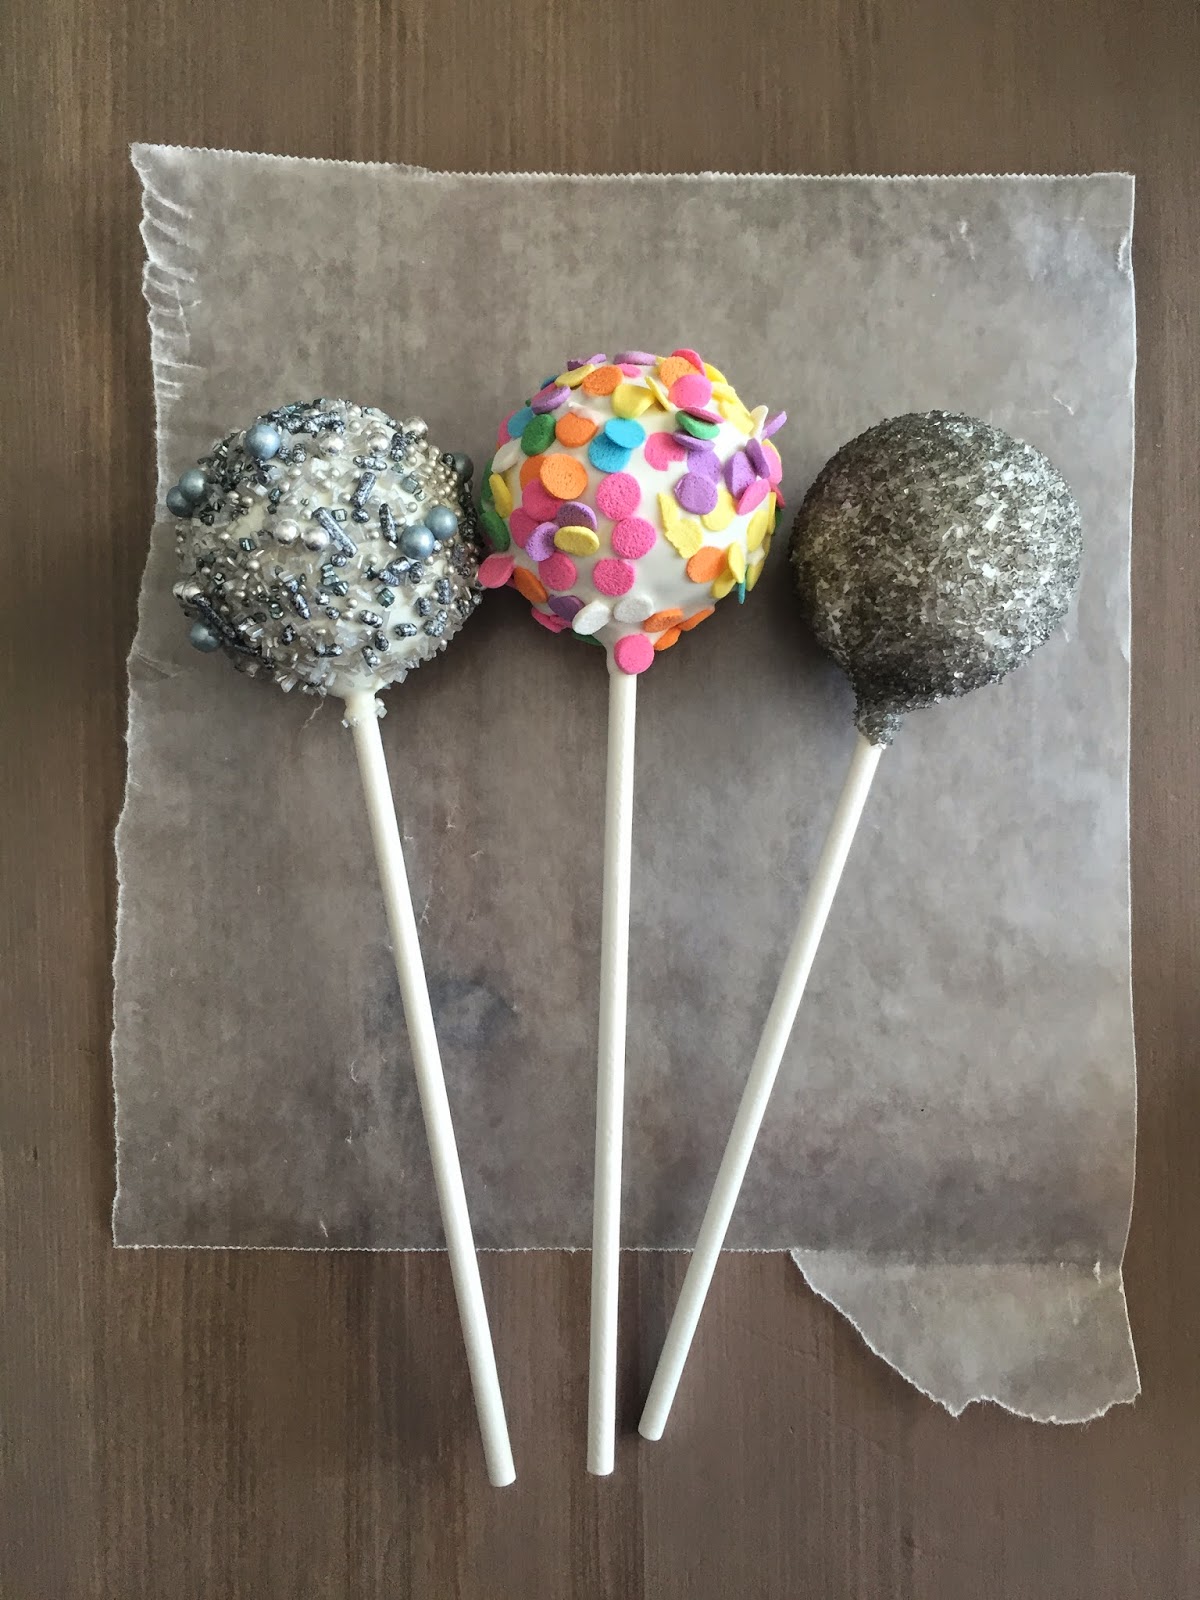
Ok, I had stuff in the house to play with and I have wanted to try the sequins effect on a cake pop, so, tah dahhh! It is not exactly as I imagined. I LOVE Mercken's superwhite but guess what, it has a bad attitude. SMH. It drips so much and dries too fast at the same time.  Can we say bipolar?? But I learned some things and that's why I do this, to learn. So here we go.

To start I used my My Little Cakepop round mold to portion my cake balls. I also have an oxo scooper, but it had other plans. So this is perfect to get my cake balls all the same size.

Just get a blob of already crumbled and mixed cake pop dough and squish inside the mold, shut it and there you have a perfectly portioned cake ball.

If you need a video on how to make cake pop dough, check out my basic cake pop video part 1 on my YouTube channel for directions on how to make that.

Of course you can use any method you want to portion your dough. But if you use the mold, after you pop out your cake ball you may notice a little bit of a ring around the middle from where the mold closed.

Guess what, I dip them like this any way because the chocolate covers the indentations nicely. So no worries. I have done this plenty of times. This was already chilled dough so may be a little different with fresh dough just crumbled and mixed.


 But if you're still not a fan of the look, simply give it a quick roll to smooth it out and you are ready to dip. I only did three. I really had to hold back because I could have made more. So many more combinations of blingy ~ sequency ~ glittery - ok those all aren't real words but you get it ... also I ran out of cake pop dough so that was the final. lolol


 Then I gathered the fun. I think this was everything. Take out what you have. It seems I have a variety of allll kinds of sprinkles - #sprinklescentral. Yes I pick them up whenever I see new ones, just in case. So these were keeping with a silver sparkly them.

All my silver sprinkles would make cute sidekick cake pops to the sequins cake pop I wanted to try. These wouldn't be used for the sequins effect but these were part of the blingy plan.


I also had these dusts / glitters.... I don't usually completely cover a cake pop in these. The luster dusts usually get lightly brushed on if that. Or I use it to make accents silver with some extract.

The glitters are usually just lightly sprinkled on some things like cake pops or cakes and cupcakes. I do more heavily on fondant or chocolate accents. So I wasn't sure how I would use them yet. I just had them there for support.


This Wilton's silver color mist is what I wanted to use to cover them! It seemed so much easier than making a paint with the luster dust and then brushing it on the cake pops. It can be a quick and helpful. But it doesn't last long. boo.

So whatever I was going to do, I planned on covering them with this spray. Not as easy as you think. I have used this before when I did not have luster dust to go over cake pops for a silver and gold theme. It works, BUT takes a few layers....


Here is what I used to make the sequins cake pop in the middle of the picture. These are confetti sprinkles. You can get them at any craft store and I am pretty sure Wilton has there own bottle. These little guys are tricky.
 I am sure this is not the only way to do it. Just trying it out! Let's keep going!


I got the cake balls on their sticks and ready to go. Once you dip you have to be ready to shed that excess chocolate quick and get your sprinkles on! AAAAHH the pressure. Here we goooo ...


 Dip straight down and pull it out quickly. In and out of the chocolate right away so they don't love the chocolate so much they want to fall right back in. Again, please see my YouTube basic cake pops tutorial for all the basic information on rolling, dipping, etc. 


Ok so we have to tap that extra off quickly and get our sprinkles on before the chocolate sets and dries and they start bouncing off the cake pop. grrrrrrr. Don't you just HATE when that happens? This particular candy melt ( Mercken's super white ) seems to be the only one I have this problem with.  If I put the sprinkles on too soon they start running down the pop > AHHHH< If I wait too long, it sets. But it's just so pretty I can't give it up. <3


Ok so these went on as quick as I could! Not quick enough. It started to set before it was covered and I had bald spots. I did not want to fill them in because I was going to cover them with a silver coating of something anyway. But still, I would have liked if all the sprinkles made it on the whole pop. Gotta be quicker!


Here's my luck with the confetti sprinkles. It wasn't too too bad, but again not the full coverage I had hoped. Quick sprinkle on the cake pop while the chocolate is wet, watching for dripping. It seems these would be easier to cover a cake with. Once the chocolate sets they are stuck the way they are. Not like butter cream where you can press them against the cake with forgiveness. You are pretty much stuck where they lay on these cake pops. But sequence is sassy and goes every which way any way.


These were the easiest to sprinkle, of course. Sugars are so sweet to us. I sprinkled with a larger silver sugar and then sprinkled a finer darker gray sugar. Everything was covered on this cake pop. THUMBS UP. Try to watch for those drippies at the bottom if  you have a smooth runny candy melt like this one.


Annnd now they are all ready for step 2, well not technically step 2, idk how many steps we are on. But step 2 to make them sparkly silvahhhh.


For this step 2 you will need something to cover them. Since I had this Wilton's silver spray I wanted to try it. Just to see....
I have covered a plain dipped cake pop with this before. Not my first choice for a plain cake pop, but seems like a better one for these textured cake pops.
I lined my table with wax paper as a liner and placed a napkin or paper towel over top of that to absorb the spray. Read! Set! Spray!


Soooo, yeahhh. This is going to take a little. So place the cake pop over the napkin and spray over the cake pop about 5-6 inches between the bottle and cake pop, twisting so that you can spray every spot of the cake pop. It doesn't look like much yet! 


Almost looks like there's more on the napkin than the cake pop. Uh huhh.
And then I wasn't sure what to do with it being all drippy so its sitting down for a little.  AHAHAHA. Until I realized a trick.


I sprayed the next two. Again for this blingy sprinkled pop, it doesn't look like much coverage. This is only the first layer though.


The sugars covered pretty nice, but they are already covered in a nice coat of ... sugars. So that helps. lol.


Then I realized this. Duh. HAHAHA. Just a mini cupcake liner to keep the spray from dripping down. I am here for you. To figure out all these duh moments. We will together. Duh.


SEE! TAHDAH! All better...


Okay, who's ready for round 2 or 3, 4, 5. Whatever it takes.


So I went over the confetti sprinkled cake pop about 4 times total.  After each spray over, make sure you let them dry. So if you have a dozen, just go down the line and by the time you're done the first coating on the 12th cake pop, you should be able to go back to the beginning.


Starting to look better...


...and better!


After I sprayed the last layer on each cake pop, I sprinkled with some of the edible, mystical, whatever, glitter I had from the beginning photos. Just to add that extra special sparkle.

I sprayed the bling sprinkle covered 2 - 3 times...


and the sugar covered also 2 times.


Like I said before, the confetti sprinkled ~ the sequins cake pop ~ was sprayed about 4 times.
Using the Wilton's spray may get you about half dozen sprayed sequins cake pops.


They turned out A-OK. What a pretty bite! And the sequins didn't taste bad with all that bling on it. Just a lil crunchy!
I do plan on a part 2 of this experiment, and since St. Patty's coming up, let's go for gold!


Thanks for checking out my first official "blog" post. It was fun to share my experimenting with you!